
Streamline lifecycle management for your organization by connecting Okta with JumpCloud through a Real-time User and Password Import SCIM integration. This integration lets you manage your organization’s user identities in Okta, and easily connect users to all of the IT resources they need through JumpCloud. After you connect Okta with JumpCloud through SCIM, depending on the integration settings you choose, users are seamlessly created, updated, and deactivated in JumpCloud according to the actions you take on users in Okta.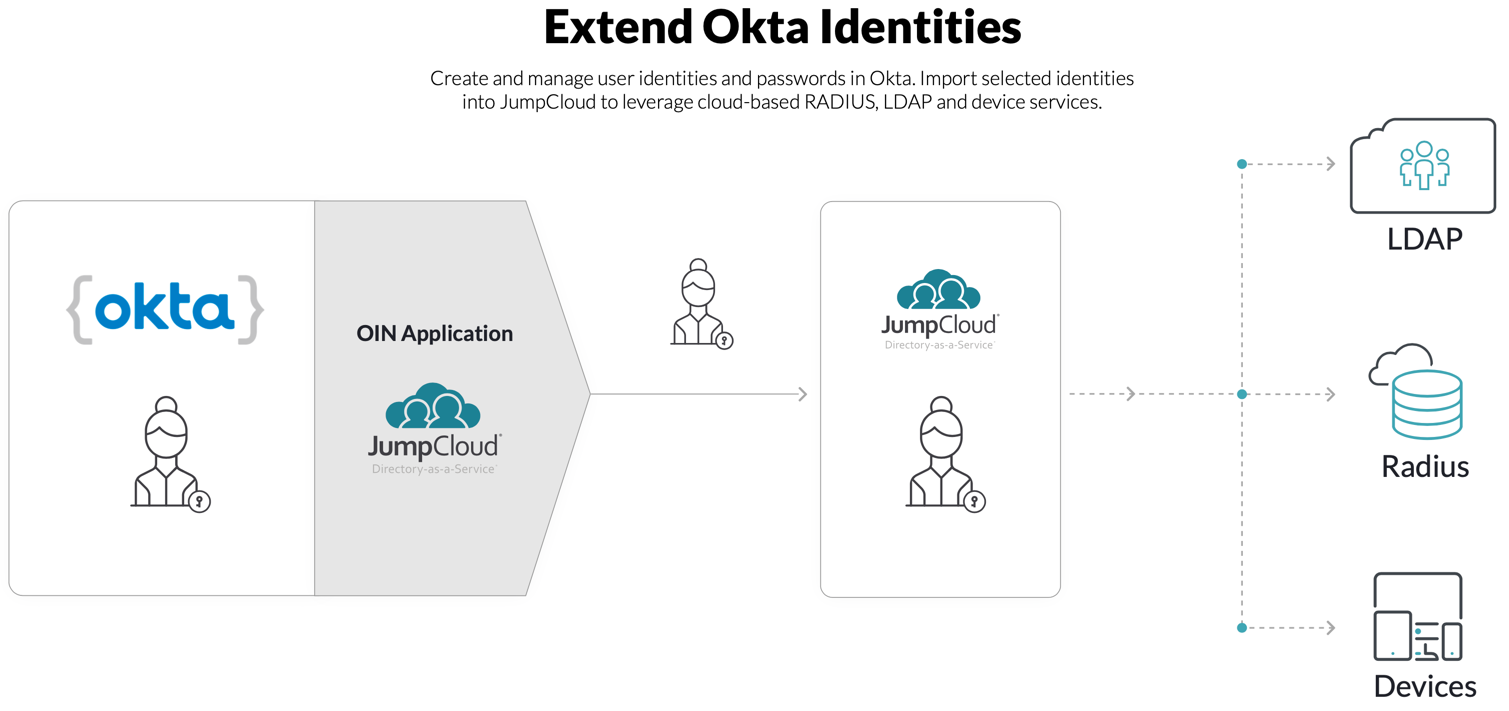
Supported Features
The following SCIM actions are supported for Okta’s User Import and Password Mastery integration with JumpCloud.
- User import: Users accounts are imported from Okta into JumpCloud
- Password sync: User account passwords are synchronized between Okta and JumpCloud; changes made to passwords in Okta are synced with JumpCloud
- Create: When you create users in Okta they’re created in JumpCloud
- Update: When you update user attributes in Okta, these updates are reflected in JumpCloud
![]()
Read the Considerations for more detail on this feature.
- Deactivate: When you deactivate or delete a user in Okta, the user is placed in a suspended state in JumpCloud
Prerequisites
- You need User Provisioning functionality enabled for your Okta account. Learn about Lifecycle Management and App Provisioning from Okta
- You need a JumpCloud API Key (see instructions below)
Recommendations
- To prevent end-user access issues, we recommend that you use the same password complexity requirements as Okta, see Manage Password and Security Settings
- Consider choosing not to expire JumpCloud account passwords. If you choose to enforce password aging for your JumpCloud account passwords, be mindful of the expiration dates for users you’re managing for Okta. See Manage Password and Security Settings to learn more about password aging
- We also recommend that you create a JumpCloud admin service account to generate the API Key you need to connect JumpCloud with Okta. This service account shouldn’t be tied to a specific user’s email address. For added security, you can require Multi-factor Authentication at login for this admin service account. See Manage Admin Accounts to learn more
Considerations
- If you update a user name in Okta for a user that is bound to resources, it won't update that user's username in JumpCloud. However, if that user isn't bound to any resources in JumpCloud, then it will change the user's username.
- When a user is associated with the JumpCloud application in their Okta account, a couple of things happen:
- Their password is sent to JumpCloud when it is changed in Okta
- Once they've been associated with JumpCloud, they log in to their Okta account for the first time after the association, and the passwords will be synced
- If a user is inactive in the source application, the user will not be created in JumpCloud. If you would like the user to exist in JumpCloud, you must create the user manually
- If you are trying to have an existing user's account managed by JumpCloud, the usernames must meet specific requirements:
- Important: The user can't be bound to any resources at the time of account takeover.
- The username in Okta is an email, however in JumpCloud the username is not an email.
- To have JumpCloud manage a user's account, the email used in Okta prefix (everything before the @ symbol) needs to match the username in JumpCloud
- For example, if the email is john.doe@okta.com, then the username in JumpCloud needs to be john.doe.
- To have JumpCloud manage a user's account, the email used in Okta prefix (everything before the @ symbol) needs to match the username in JumpCloud
- If you are trying to have a new user's account managed by JumpCloud, the username has specifications that will result in a failure if not met. The requirements are:
- The username needs to start with a letter
- It needs to be 30 characters or less
- These can only include valid unix characters (letters, numbers, hyphens ' - ,' periods ' . ,' and underscores ' _ .')
- If a password is changed directly from the user console it clears the credential manager on a Windows device. This is also the case when a user is externally managed and password updates come from a 3rd party, like Okta
Known Issues:
- After you import users from Okta, users and their attributes are synced between JumpCloud and Okta. The users that you import from Okta are fully editable in JumpCloud in both the Admin and User Portals. This means that users can change their password and user attributes in the JumpCloud User Portal. If a user updates their password in the User Portal, it can be overwritten by Okta, potentially placing the user in a bad state. We recommend that you disable the ability for users to update their user attributes in the JumpCloud User Portal. You can do this in the Admin Portal’s General Information Org Settings. If you disable your end users’ ability to modify their user attributes in the User Portal, admins are still able to modify end-user attributes in the JumpCloud Admin Portal. Learn more about this feature in Settings in the JumpCloud Admin Portal
- If you manage end-users devices with JumpCloud and integrate Okta with JumpCloud, passwords can become out of sync between Okta and JumpCloud if a user changes their password through their device. You can leverage Okta integration with JumpCloud managed devices by keeping the following in mind:
- macOS: JumpCloud's Menu Bar App prompts users to confirm their password if they become out of sync when they're provisioned to JumpCloud from Okta
- To see more detailed information see Managing Password Resets with Okta and JumpCloud Managed Devices below
Attribute Mappings:
The following table lists attributes that JumpCloud can receive from Okta.
Learn about JumpCloud Properties and how they work with systemusers in our API.
| Okta Attribute Name | JumpCloud Attribute Name | Notes |
|---|---|---|
| login | userName |
For this attribute to map correctly, this attribute has been updated to |
| user.firstName | givenName | |
| user.lastName | familyName | |
| user.middleName | middleName | |
| user.email | ||
| user.emailType | emailType |
For this attribute to map correctly, this attribute has been updated to |
| user.Title | title | |
| user.displayName | displayName | |
| user.displayName | primaryPhone | |
| user.primaryPhoneType | primaryPhoneType |
For this attribute to map correctly, this attribute has been updated to |
| user.addressType | addressType |
For this attribute to map correctly, this attribute has been updated to |
| user.streetAddress | streetAddress | |
| user.city | locality | |
| user.state | region | |
| user.zipCode | postalCode |
Getting Your API Key in JumpCloud
You need a JumpCloud API Key to connect Okta and JumpCloud. This key is found in the JumpCloud Admin Portal.
![]()
The API key from MTP admins will not work with the JumpCloud integration app in Okta. Only the tenant specified admin's key will work in this integration.
To generate an API Key:
- Log in to the JumpCloud Admin Portal.
- Click your account initials displayed in the top-right and select My API Key from the drop down menu.
- If you haven't generated an API key before, click Generate API Key to have an API key generated and displayed. If you have an API key but don't have it stored, click Generate New API Key.
![]()
API Keys are only displayed at the time they’re created. Make sure to store it in a secure place, like JumpCloud’s Password Manager so you can access it when you need it.
If you're generating a new API key, it will revoke access to the current API key. This will render all calls using the previous API key inaccessible. You will have to update any existing integrations that use an API key with the newly generated value. See JumpCloud APIs to see the impacted integrations.
- Paste the key into Okta’s API integration settings.
Enabling and Configuring SCIM Integration in Okta
To enable and configure SCIM integration in Okta:
- Log in to Okta.
- Go to Applications, and open the JumpCloud application.
- In the JumpCloud application, go to General.
- For Application visibility, select the following options:
- Do not display application icon to users
- Do not display application in the Okta Mobile App
- Go to Provisioning, then click Configure API Integration.
- Select Enable API Integration.
- Paste the API Key that you copied from the JumpCloud Administrator Portal.
- Click Test API Credentials, this isn't required, but recommended.
- If your optional test is successful, or if you choose not to test, click Save.
- Go to Provisioning > Settings > To App, then click Edit.
- (Required) Select Enable for the options you want to enable for your SCIM integration with JumpCloud. You can choose to Create Users, Update User Attributes, and Deactivate Users.
- (Required) For Sync Password, select Enable and Sync Okta Password.
- Scroll past the Provisioning options, then click Save to apply your selected provisioning settings.
Verifying Your Integration
After you’ve integrated JumpCloud with Okta, you can verify your integration by performing the following actions in Okta:
- Create a user: If you’re successfully integrated, when you create a user in Okta, the user is added in JumpCloud and you'll see the user in the Users list
- Update a user: If you’re successfully integrated, when you update a user in Okta, the user is updated in JumpCloud. You can verify the update by viewing the user's Details panel
- Suspend a user: If you’re successfully integrated, when you deactivate or delete a user in Okta, the user is suspended in JumpCloud. You can verify the suspension by viewing the user in the Users list and by viewing their Details panel. See Suspend and Restore User Accounts
Learn more about these actions and statuses in Getting Started: Users and User Account Status.
Troubleshooting Your Integration
If you run into issues during your verification of the integration, you can troubleshoot in the following ways:
- Check your provisioning selections: Make sure you selected the provisioning option for the action you’re performing. For example, make sure that you have selected Update User Attributes if changes you’re making to users in Okta aren’t updating in JumpCloud
- Check your sync password selection: Make sure you’ve selected the Sync Okta Password option for Sync Password
Migration Steps
To create a new instance of JumpCloud in Okta:
- Log in to your Okta org as an administrator.
- Select to view the Classic UI.
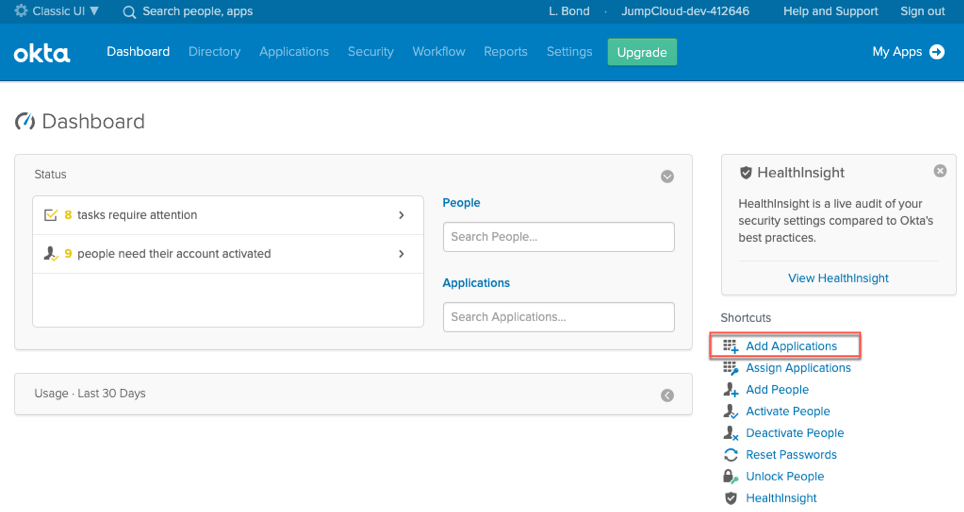
- Click Add Applications.
- Search for JumpCloud, then select the application.
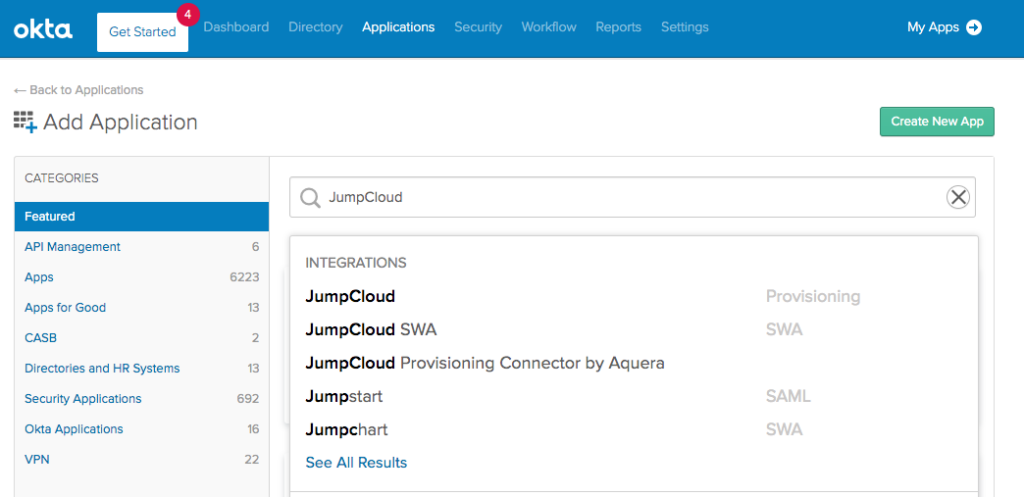
- Click Add.
- Configure the new application with provisioning as described in Enabling and Configuring SCIM Integration in Okta.
Managing Password Resets with Okta and JumpCloud Managed Devices
In this configuration, Okta will export Users, attributes, and passwords to JumpCloud through the OIN App. Passwords should be set or reset within Okta once this configuration has been enabled. JumpCloud will receive these passwords from Okta when a user resets within their Okta user portal. If you are additionally leveraging JumpCloud to manage your macOS, Windows, and Linux devices, you must consider the following to ensure that your users utilize and know the best practices for password resets.
With this integration, all passwords must be reset within Okta. If passwords are changed in JumpCloud, they will not be exported back to Okta and will result in discrepancies between the user’s Okta and JumpCloud passwords.
Managing Password Resets and JumpCloud Managed MacOS Devices
There can be several workflows when resetting passwords within this configuration. When devices are managed by JumpCloud, passwords should be reset in Okta and later confirmed on the device. Ensure that the following best practices are leveraged when users commit a password reset within Okta.
Additionally, JumpCloud requires macOS devices to be online during the password change in Okta so that the device will receive the new password via the JumpCloud Agent. This can be achieved when users are logged into their device and change the password within a browser window. The JumpCloud Tray App then requests a confirmation of the password change. See the workflow diagrams below.
Password Reset with Okta and a Single MacOS Device (Online) - Recommended
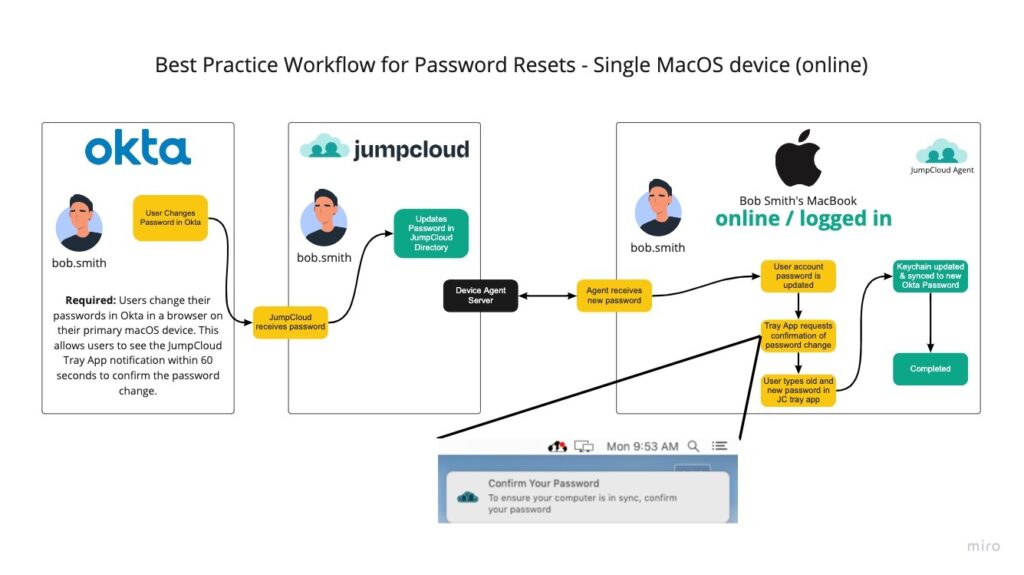
In this diagram, a user resets their password in a browser window on their JumpCloud managed macOS device. This sends the password to JumpCloud which updates their JumpCloud User Password. Within 60 seconds, their macOS JumpCloud Device Agent checks in with JumpCloud, receives the new password hash, and displays a notification. The User must confirm their password in order for the FileVault (SecureToken) password and User Login password to be synced within the macOS keychain.
Password Reset with Okta and a Single MacOS Device (Offline) - Not Recommended
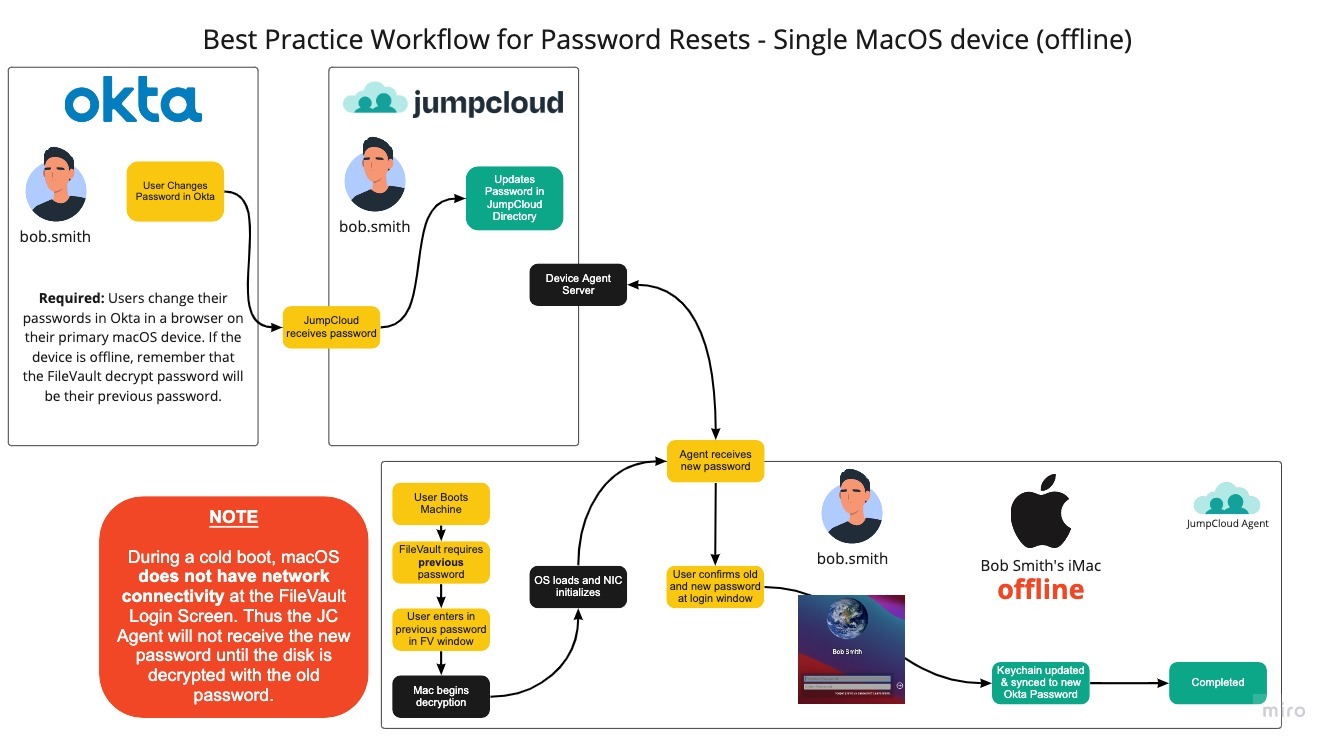
JumpCloud recommends that users change their passwords while logged in to their primary macOS device. If the user’s macOS device is offline, additional steps must be taken to ensure the password is updated in macOS. The workflow shown in the previous diagram is not recommended unless absolutely necessary.
When a user changes their password in Okta, while their macOS device is offline, Okta sends the updated password to JumpCloud. JumpCloud updates the user’s JumpCloud password to the new Okta password. Because the macOS device is offline, no updates are received until FileVault is unlocked.
When the user cold-boots their macOS device, FileVault prompts for a password. The user must enter the previous password–that is, the one they used before the password reset in Okta. This is because the macOS device is encrypted, the NIC is not initialized, and the JumpCloud Agent is not active until FileVault is unlocked.
Once the user has unlocked FileVault using their previous password, the JumpCloud Device Agent will run, connect to the internet, and receive the new password hash from JumpCloud. The user will see a second login prompt asking them for their previous and new password. The user should use the previous password they just used to unlock the Filevault Window and the new password they’ve just reset in Okta.
If typed correctly, the user is then logged into their profile and the macOS keychain is synced and updated appropriately.
Password Reset with Okta and Multiple MacOS Devices (Online) - Recommended
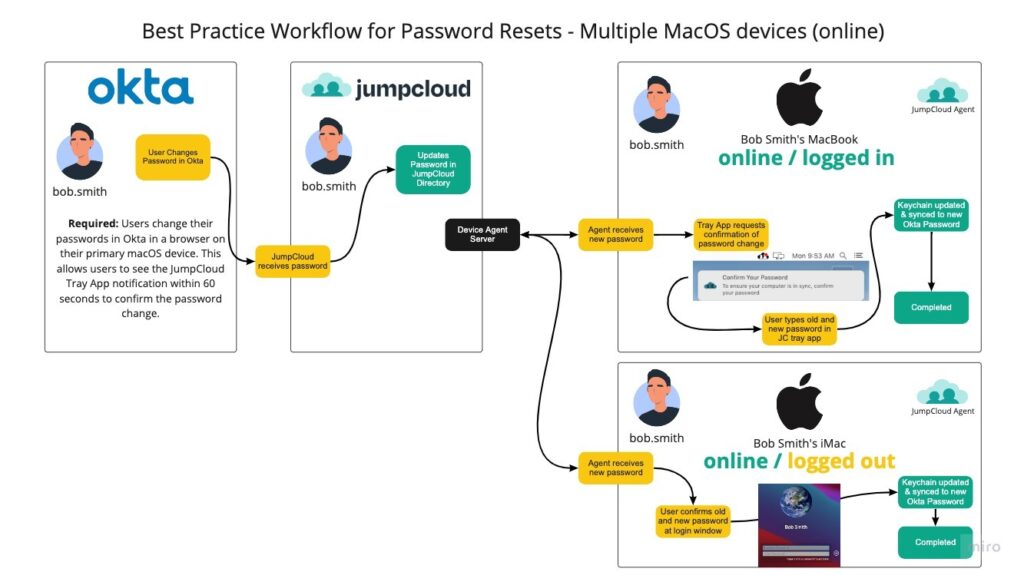
In the diagram above, a user resets their password within a browser window on their primary JumpCloud managed macOS device. This sends the password to JumpCloud which updates their JumpCloud User Password. Once their macOS JumpCloud Device Agent checks in with JumpCloud, it receives the new password hash and displays a notification. The user must confirm their password in order for the FileVault (SecureToken) password and User Login password to be synced in the macOS keychain.
For the second macOS device, the user performs a login where the User Login prompt requests their previous and new password. This updates the macOS keychain to utilize the new password appropriately.
JumpCloud recommends that the second or additional macOS devices be online and past the FileVault Login so the JumpCloud Device agent and the NIC are active and initialized. It is not recommended to have the additional macOS devices offline during a password reset operation in Okta.
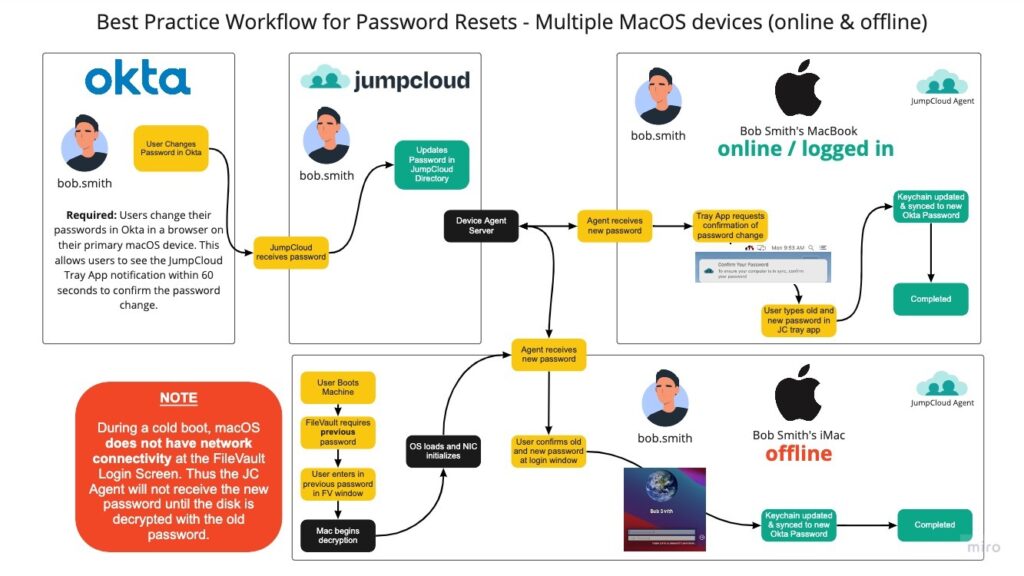
Password Reset with Okta and Multiple MacOS Devices (Online/Offline) - Not Recommended
![]()
JumpCloud recommends only using this workflow if it is absolutely necessary to ensure proper password syncing.
In the diagram above, a user resets their password within a browser window on their primary JumpCloud managed macOS device. This sends the password to JumpCloud which updates the JumpCloud User Password. Once the macOS JumpCloud Device Agent checks in with JumpCloud, it receives the new password hash and displays a notification. The user must confirm their password in order for the FileVault (SecureToken) password and User Login password to be synced within the macOS keychain.
For the second macOS device, the user cold-boots their macOS device. FileVault will prompt for a password. This is the password the user used before the password reset in Okta. This is because the macOS device is encrypted, the NIC is not initialized, and the JumpCloud Agent is not active until after FileVault is unlocked.
Once the User has unlocked FileVault using their previous password, the JumpCloud Device Agent will run, connect to the internet, and receive the new password hash from JumpCloud. The user will see a second login prompt asking for their previous and new passwords. The user should use the previous password they just used to unlock the Filevault Window and the new password they’ve just reset within Okta.
JumpCloud recommends that the second or additional macOS devices be online and past the FileVault Login so the JumpCloud Device agent and the NIC are active and initialized. It is always best practice to have the additional macOS devices online during a password reset operation in Okta.
Password Reset with Okta and Windows Devices
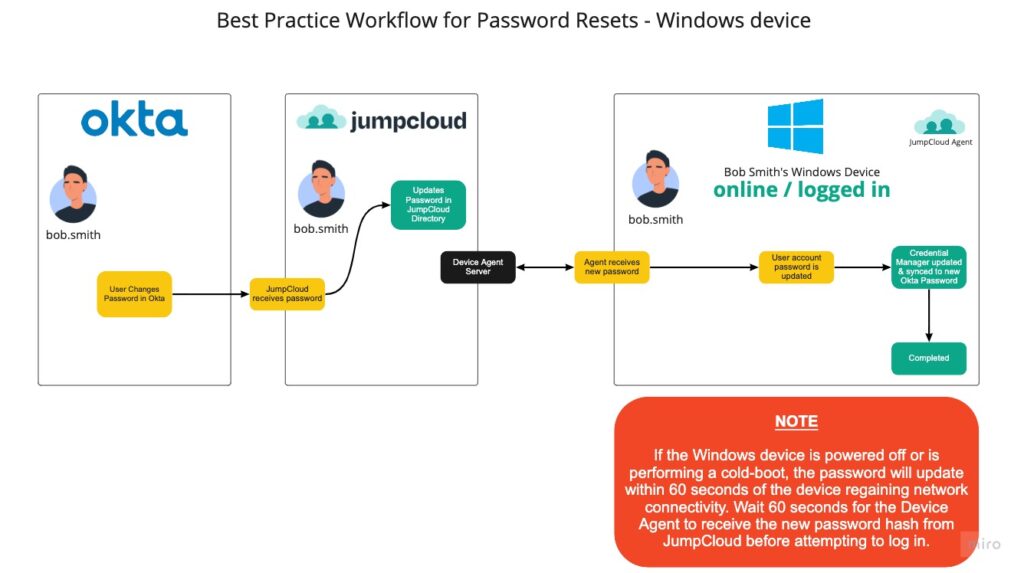
In the diagram above, a user resets their password within a browser window on their JumpCloud managed Windows device. This sends the password to JumpCloud which updates the JumpCloud User Password. Once the JumpCloud Device Agent checks in with JumpCloud, it receives the new password hash and updates the local password hash within Windows. The next time Windows requests a password, it will be using the new password the user just set.
Password Reset with Okta and Linux Devices

In the diagram above, a user resets their password within a browser window on their JumpCloud managed Linux device. This sends the password to JumpCloud which updates their JumpCloud User Password. Once the JumpCloud Device Agent checks in with JumpCloud, it receives the new password hash and updates the local password hash within Linux. The next time Linux requests a password, it will be using their new password they’ve just set.
Additional Resources:
Walk through a guided simulation for Configuring Okta Real-Time User and Password Import