The Multiplier integration automates group assignment and enables identity and access management (IAM) workflows to be implemented using Atlassian’s Jira Service Management (JSM) and JumpCloud (Check out our blog for an overview). Multiplier's integration with JumpCloud allows customers to trigger self-service actions in JumpCloud from JSM, helping automate the fulfillment of common help desk requests, such as:
- Application access requests
- Group assignment
- Employee onboarding and offboarding requests
- Password and MFA resets
This removes the manual processes and workflows between HR and IT related to new hires and employee/contractor change notifications. Read this article to learn how to configure the Multiplier Integration.
Prerequisites
- A Site administrator account in Jira cloud.
- A JumpCloud API key to connect Multiplier and JumpCloud.
- It is recommended to create a separate JumpCloud administrator account to generate the JumpCloud API key for this integration.
Installing Multiplier plugin using Jira Service Management (JSM)
To get your JumpCloud API Key
- Log in to the JumpCloud Admin Portal with the administrator account you want to use to generate the API key for this integration: .
- Click your initials in the top right corner.
- Select My API Key.
- Copy the API Key.
![]()
The Client ID and Secret (token) may only be shown once. Copy them to a secure location, like the JumpCloud Password Manager, for future reference.
To install the Multiplier app in Jira
- Navigate to the Atlassian Marketplace listing for Multiplier.
- Click on the Try it free button and select your Jira cloud instance.
- Click on Start free trial.
Configuring the JumpCloud integration in Multiplier
- Navigate to Apps > Manage your apps in your Jira instance.
- You should see Multiplier listed on the left menu. Click on Configuration, and click on the JumpCloud logo.
- You will see a modal where you can paste the API key you copied earlier.
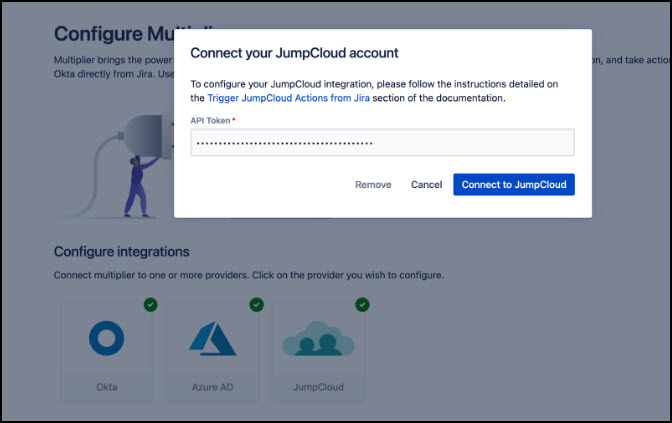
- Select Connect to JumpCloud.
- Click Close.
Once you’ve done that, you will need to specify which user groups in Jira should have access to the issue panel, and other features. If you don’t see the group picker field being populated with options, you will need to manually enter the name of the group (this is usually something like site-administrators, or service-desk-users)
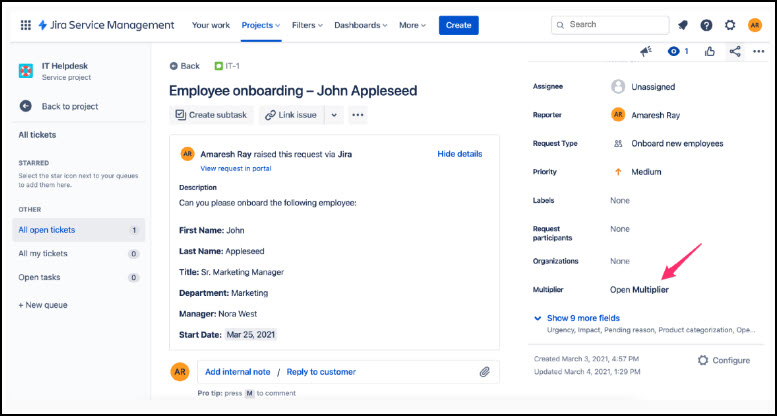
To trigger actions in JumpCloud, navigate to an issue and click on the Open Multiplier link in the sidebar.
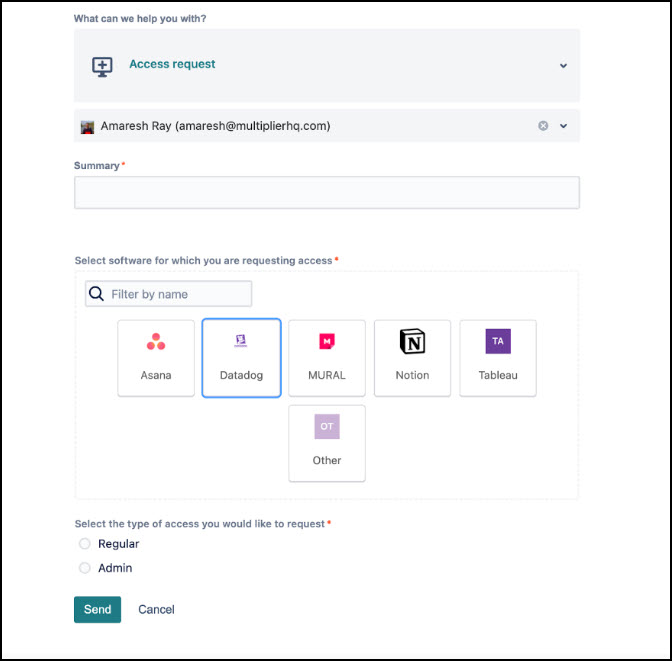
Enabling self-service access requests for JumpCloud apps
The Self Service access request integration, allows employees to request access to applications in JumpCloud from the JSM portal, and optionally routes the request to their manager or application owner for approval in Jira.
Once the manager approves the request, JumpCloud assigns the user to the group, which automatically provisions the application, eliminating the need for IT to manage individual requests manually, and at the same time, end users get what they need quickly and easily.
This guide will walk you through the steps needed to set up Multiplier’s self-service access request workflow feature after you’ve connected your JumpCloud account, illustrated in the steps above.
To request access in Multiplier
In the Multiplier application, select the software for which you are requesting access:
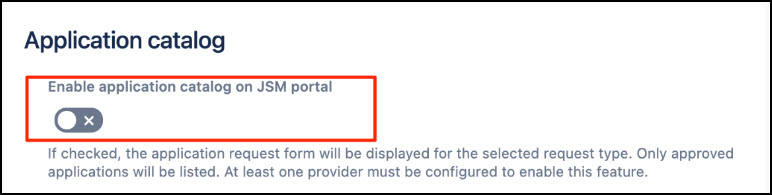
- Turn on the enable application catalog setting in Multiplier’s configuration. This can be accessed through the Apps > Manage your apps in the Jira nav.
- To display a list of apps in the JSM portal, you will need to associate the app catalog with a Request Type. If you do not want to use an existing request type, then go to Project Settings > Request types and click Add new request type.
- To provision apps immediately after they’re requested, keep the required approval setting disabled. Otherwise, switching it on will display the default approval behavior when apps are requested, which can be further customized for each individual app.
- If enabling approvals, you’ll need to map the workflow status that a request transitions to once approval has been granted. This is how Multiplier determines whether approval has taken place so it can go ahead and carry out provisioning.
- Select the issue’s field for populating approvers (typically the Approvers field).
- Select the default approver – this can either be the application owner, the requestor’s manager, or a Jira user of your choice.
- Lastly, select the status Multiplier should transition the issue to once the app has been provisioned. If provisioning fails for some reason, this step will not be carried out.
To populate the App Catalog
Multiplier will automatically discover apps once connected to your JumpCloud instance. You can view this list by clicking on Apps > Multiplier in the Jira top nav.
By default, all apps appear with an ‘Unassigned’ status. To sanction apps that end users are able to request, change their status to ‘Approved’.
Apps with multiple identity groups mapped to them can be configured with different entitlements to let users select the type of access they want. These access levels can then be mapped to different identity groups.

Automating group assignments in JumpCloud from Jira
Multiplier’s JumpCloud integration enables the admins to automate the following actions from a JSM request :
- Create user
- Activate user
- Expire user’s password
- Lock user’s account
- Unlock user’s account
- Suspend user
- Unsuspend user
- Add user to groups
- Remove user from groups
An example of using JumpCloud actions to add a user to a group using Multiplier would be:
- Navigate to the Workflows screen, and Edit the workflow that maps to the request type you’re using to capture this request.
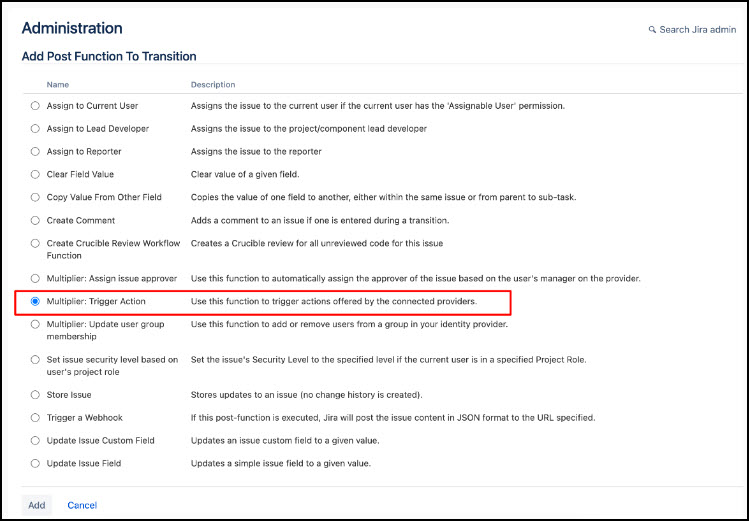
- Select the Issue, create a transition, and add the Multiplier Trigger Action post function.
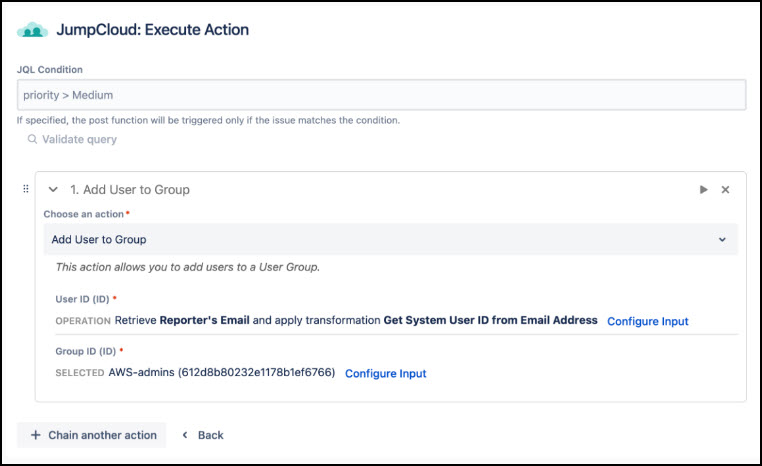
3. Select Add User to Group as the action, and map the user by selecting the Reporter’s Email field and applying the Get System User ID from Email Address transformation. Similarly, map the group to a field or select from a list of groups from JumpCloud. You can use Multiplier’s Portal Fields feature to insert a field containing JumpCloud groups on your request form.
- Click on Add and then Publish your workflow to save the changes.