
Use JumpCloud OpenID Connect (OIDC) Single Sign On (SSO) to give users secure and convenient access to web applications with a single set of credentials. You can use the Custom OIDC App connector with any app that supports OIDC-based SSO.
Prerequisites
You need in-depth knowledge of the Relying Party’s (RP) OIDC capabilities and requirements to use the OIDC connector.
- Verify the app supports a grant type of authorization code.
- Obtain the Redirect URI for the app.
- Obtain the Login URL that the RP uses to start the login flow.
- Determine if the app you’re configuring can protect a client secret or if it uses a public client.
- Determine which claims/attributes the RP requires.
Configuring the Custom OIDC Connector
To configure JumpCloud
- Log in to the JumpCloud Admin Portal.
- Go to USER AUTHENTICATION > SSO Applications.
- Click the (+ Add New Application) button. There are two options:
- Type OIDC in the search box and select it from the dropdown.
- Click Next.
OR
- Click Next.
- Select Custom Application.
- Click Next.
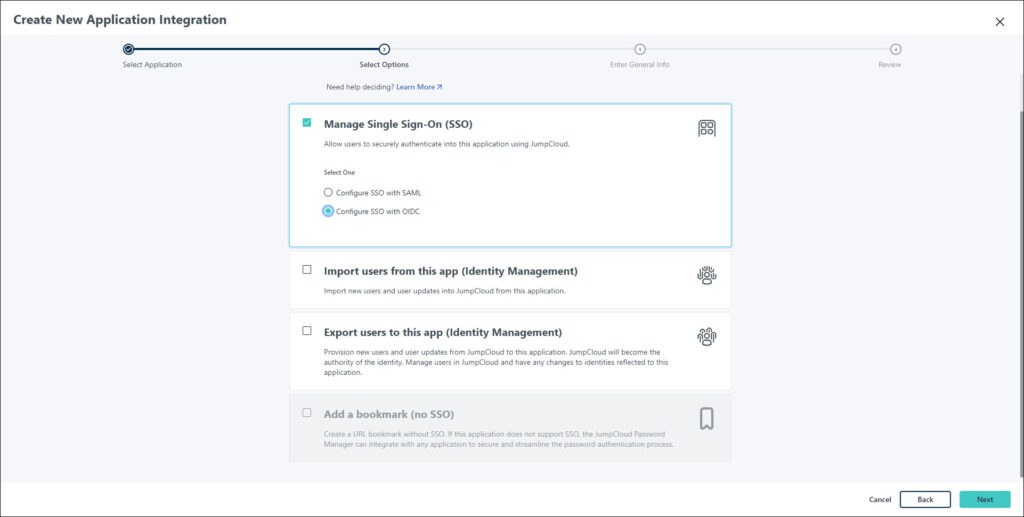
- Select Manage Single Sign-On and then select Configure SSO with OIDC.
- Click Next.
- Type OIDC in the search box and select it from the dropdown.
- In the Display label, type your name for the app. Optionally, you can enter a description, adjust the user portal image and choose to hide or show it in the user portal.
![]()
- If using the Custom Application workflow, the default color indicator will be displayed in the Admin Portal.
- To change this, go under the General Info tab > Display option, then select the Logo.
- If using the OIDC template from the dropdown, the default custom OIDC app logo will be displayed in the Admin Portal.
- Click Next and then Configure Application.
- In the SSO tab, the following window appears.
Endpoint Configuration
- Grant Types:
- Authorization Code is checked by default and cannot be deselected.
- Refresh Token can be checked at a later time if you wish to refresh your connector's token.
- Enter one or multiple Redirect URIs (Uniform Resource Identifier) with the value(s) supplied by the RP.
- Click (+Add URI) button to add more than one URI.
- Select the appropriate Client Authentication Type:
- Client Secret POST - the client authorizes itself providing the secret in the HTTP request body as a form parameter.
- Client Secret Basic - the simplest method of client authentication using client secrets. It’s a method where an app uses the HTTP Basic AuthenticationScheme to authenticate with the authorization server.
- Public (None PKCE) - Client authentication set to ‘none’ and with the use of Proof Key of Code Exchange (PKCE) was created as a secure substitute for the OAuth implicit flow, where the client receives access tokens as the result of authorization.
![]()
The client authentication type will depend on what is supported by the RP.
- Enter the Login URL with the value supplied by the RP.
Attribute Mapping (optional)
You can add scopes and claims/attributes for more granular access management, see OIDC Attributes (Claims) to learn more.
- Add a standard scope by selecting Email, Profile, or both.
- Add dynamic attributes that will be populated from attributes on the user record or the user group by clicking Add Attribute in the USER ATTRIBUTE MAPPING section.
- Add constant attributes, which are specific, unchanging values sent for all users, by clicking Add Attribute in the CONSTANT ATTRIBUTES section.
- Select include group attribute to send the list of groups of which the user is a member .
![]()
If the RP supports it, you can add more than what is required.
- Under User Consent, Automatically consent is selected by default and cannot be deselected.
- Click Activate.
- If the client is not a public client, then a window will display the client secret.
![]()
The Client ID and Secret (token) may only be shown once. Copy them to a secure location, like the JumpCloud Password Manager, for future reference.
- Click Got It.
![]()
You can regenerate your client secret at any time. See Regenerate OIDC Secrets to learn more.
Configuring the RP
Enter the following information in the configuration in the RP console:
- The app’s OIDC client ID.
- If the client is not public, the app’s OIDC client secret.
- JumpCloud’s OIDC well-known config - https://oauth.id.jumpcloud.com/.well-known/openid-configuration.
JumpCloud Well-Known OpenID Configuration
- https://oauth.id.jumpcloud.com/.well-known/openid-configuration
- https://oauth.id.jumpcloud.com/.well-known/jwks.json
JumpCloud OpenID Auth Endpoint
- https://oauth.id.jumpcloud.com/oauth2/auth
JumpCloud OpenID Issuer Endpoint
- https://oauth.id.jumpcloud.com/
JumpCloud OpenID Token Endpoint
- https://oauth.id.jumpcloud.com/oauth2/token
JumpCloud OpenID User Info Endpoint
- https://oauth.id.jumpcloud.com/userinfo