Seamlessly onboard new users and sync user updates from Personio to Jumpcloud. The integration creates efficiencies for IT and HR by reducing manual overhead and security concerns related to manual data entry and access based on outdated user data.
Read this article to learn how to configure the Personio Integration.
Prerequisites
- A JumpCloud administrator account.
- JumpCloud SSO Package or higher or SSO à la carte option
- An administrator account in Personio.
- For SSO, you must be on the Personio Enterprise plan.
- Your Personio URL (e.g., https://{mycompany}.personio.de).
- Read access to the Personio employees’ API and to specific attributes available through that API for a successful integration.
Important Considerations
- You must set up the integration in the Personio application first and then in JumpCloud.
- To set up both SSO and Identity Management (IdM), two separate app connectors are needed:
- Personio IdM connector using the Personio prebuilt application connector.
- Personio SSO connector using a Custom OIDC application connector.
- When generating the integration credentials in Personio, leave the default mapped attributes in the scopes. Choosing unneeded attributes can cause the integration to timeout and fail.
- When importing new users and updates for existing users, the statuses that are classified as inactive for this integration are: Leave and Inactive.
- Users will not be created in JumpCloud if they have one of these statuses in Personio.
- When a user’s status changes to either Leave or Inactive, the user will automatically be suspended in JumpCloud.
- When a user’s status changes from either Leave or Inactive to Onboarding or Active and the reactivationAllowed option is set to true, the user’s state in JumpCloud will change from Suspended to Active.
- When a user’s status changes from either Leave or Inactive to Onboarding or Active and the reactivationAllowed option is set to false, the user will remain suspended in JumpCloud until you change the user state back to Active.
- The timestamp in the User Import Complete email is UTC.
Attribute Considerations
- A default set of attributes are managed for users. See the Attribute Mappings section for more details
Configuring the Identity Management Integration
To configure Personio
- Log into Personio.
- Go to Marketplace from the left navigation panel.
- Search for JumpCloud and click it.
- Click Connect.
- Click Generate new credentials.
- Copy the Client ID and Client Secret.
![]()
The Client ID and Secret (token) may only be shown once. Copy them to a secure location, like the JumpCloud Password Manager, for future reference.
To configure JumpCloud
- Log in to JumpCloud Admin Portal.
![]()
If you would like to use the Staged user state to make it easier to identify users who have been imported and to complete the onboarding process without granting access, complete the following steps. You can learn more about the Staged user state in the Manage User States article.
- Go to Users > Settings.
- In the Application / Directory Integrations dropdown, select Staged.
- Click Save.
- Navigate to DIRECTORY INTEGRATIONS > HR Directories.
- In the Personio tile, click Configure > + Create New Application.
- Click Next and then enter a Display Label. Optionally, you can enter a Description and Display Option for the application.
- In the Bookmark field, enter your application URL (e.g., https://{mycompany}.personio.de).
- Optionally, if you are configuring a separate SSO connector, we recommend unchecking the Show this application in User Portal option, to avoid confusion for users about which Personio app to select for SSO in the User Portal.
- Click Save Application and then Configure Application.
- On the Identity Management tab, click Configure.
- You’re presented with two fields:
- Client ID – copy and paste the Client ID generated in the previous section
- Client Secret – copy and paste the Client Secret generated in the previous section
- Click Activate.
Attribute Mappings
The following table lists attributes that JumpCloud sends to the application. See Attribute Considerations for more information regarding attribute mapping considerations.
Learn about JumpCloud Properties and how they work with system users in our API.
Personio User Attributes
| Personio Attribute Display Label | Personio API Attribute | JC systemuser property | JumpCloud User Field in Admin Portal | Notes |
|---|---|---|---|---|
| Subcompany | subcompany | company | Company (suggested) | Optional |
| Cost center | cost_centers | costCenter | Cost Center (suggested) | Optional (Multiple cost_centers can be assigned in Personio. Only the first cost_center value in the list will be used) |
| Department | department | department | Department (suggested) | Optional |
| Company email | REQUIRED | |||
| Employment Type | employment_type | employeeType | Employee Type (suggested) | Optional |
| First name | first_name | firstname | First Name (suggested) | Optional |
| Position | position | jobTitle | Job Title (suggested) | Optional |
| Last name | last_name | lastname | Last Name (suggested) | Optional |
| Office | office | location | Location (suggested) | Optional |
| Supervisor | supervisor.email | managerEmail | Manager (suggested) | Optional |
| N/A | organization | INHERITED | ||
| username | Username | REQUIRED | ||
| Status | status | state | User State | CALCULATED |
| Personio Attribute Display Label | Personio API Attribute | JC systemuser property | JumpCloud User Field in Admin Portal | Notes |
Configuring the SSO Integration
![]()
OAuth SSO is only available with the Personio Enterprise plan.
Creating a new JumpCloud Custom Application Integration
- Log in to the JumpCloud Administrator Portal.
- Navigate to USER AUTHENTICATION > SSO Applications.
- Click + Add New Application.
- In the the Custom Application tile, click Select.
- Verify your selection by clicking Next.
- Select Manage Single Sign-On (SSO) > Configure SSO with OIDC and then click Next.
- In the Display Label, type Personio SSO for the application. Optionally, you can enter a Description, adjust the User Portal Image and choose to hide or Show in User Portal.
- Click Save Application.
- If successful, click Close or Configure Application.
To configure JumpCloud
- Create a new custom OIDC application or select it from the Configured Applications list.
- Select the SSO tab.
- Enter the following information into the fields listed below:
- Redirect URIs – https://{mycompany}/oauth/callback
- Client Authentication Type – Client Secret Post
- Login URL – https://{mycompany}/oauth/authorise
- Attribute Mapping – email | email
- Click activate.
- Copy the Client ID and Client Secret. You will need this in the next section.
![]()
The Client ID and Secret (token) may only be shown once. Copy them to a secure location, like the JumpCloud Password Manager, for future reference.
- Click Got It.
To configure Personio
- Log into Personio.
- Navigate to Settings > Integrations > Authentication.
- Enter the following information:
- Authorization URI – https://oauth.id.jumpcloud.com/oauth2/auth
- Token URI – https://oauth.id.jumpcloud.com/oauth2/token
- Userinfo URI – Get | https://oauth.id.jumpcloud.com/userinfo
- Scopes – openid
- ClientID – Paste the Client ID you copied from JumpCloud.
- ClientSecret – Paste the Client Secret you copied from JumpCloud.
- Claim field – email
- Click Submit.
![]()
If you select Enforce oAuth (optional), this will mandate all Personio users to login through JumpCloud.
Authorizing User SSO Access
Users are implicitly denied access to applications. After you connect an application to JumpCloud, you need to authorize user access to that application. You can authorize user access from the Application Configuration panel or from the Groups Configuration panel.
To authorize user access from the Application Configuration panel
- Log in to the JumpCloud Admin Portal.
- Go to USER AUTHENTICATION > SSO Applications, then select the application to which you want to authorize user access.
- Select the User Groups tab. If you need to create a new group of users, see Get Started: User Groups.
- Select the check box next to the group of users you want to give access.
- Click save.
To learn how to authorize user access from the Groups Configuration panel, see Authorize Users to an SSO Application.
Validating SSO authentication workflow(s)
IdP Initiated
- Access the JumpCloud User Console.
- Select the application’s tile.
- The application will launch and login the user.
SP Initiated
- Navigate to your Service Provider application URL.
- You will be redirected to log in to the JumpCloud User Portal.
- The browser will be redirected back to the application and be automatically logged in.
Importing new users and updates from Personio
To import with the JumpCloud Admin Portal
- Log in to the JumpCloud Admin Portal.
- Go to USER AUTHENTICATION > SSO.
- Search for Personio and click to open its configuration panel.
- Select the Identity Management tab.
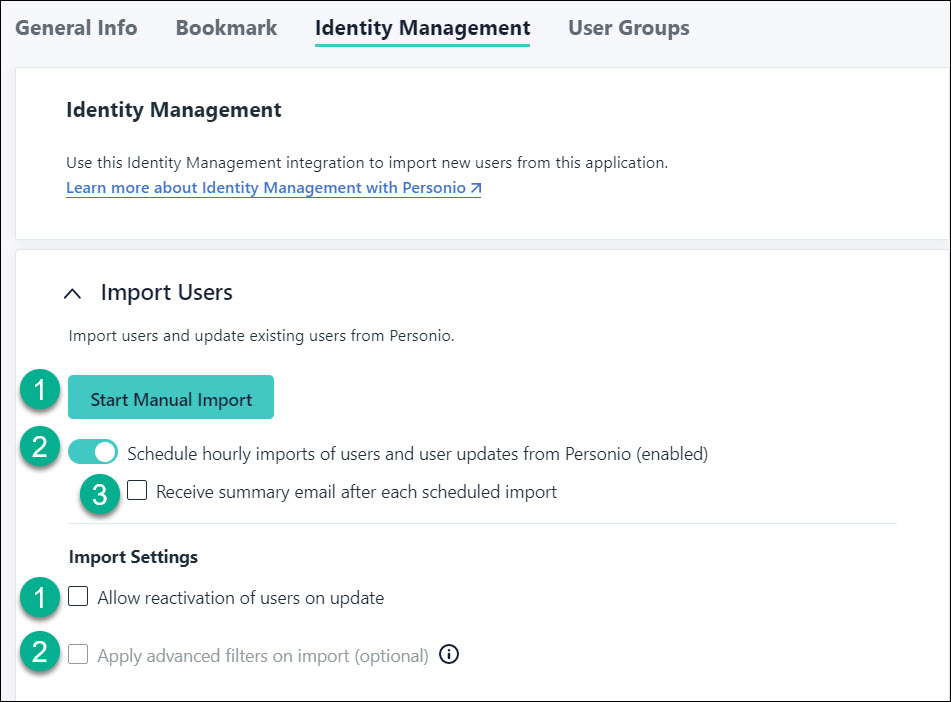
- There are several settings available for importing users from Personio to JumpCloud.
![]()
Selected import options will apply to both manual and scheduled imports.
Import Users
- Manual Import – clicking the Start Manual Import button kicks off the process flow for doing an immediate and one-time import of users from Personio to JumpCloud.
- Scheduled Imports (hourly) – enabled by default for all new connectors. The first scheduled import will start within an hour after the new connector is saved. Scheduled imports will then run at the same time every hour as the initial scheduled import.
![]()
Any connectors created prior to the availability of scheduled imports will have this option disabled. To run scheduled imports, you must enable this option.
- Selecting the Receive summary email after each scheduled import results in user import complete emails being sent after each hourly import.
![]()
It's recommended to enable this for the first few scheduled imports to ensure the imports are running correctly.
Import Settings
- Allow reactivation of users on update. Checking the box for this setting will result in the user state changing from Suspended to Active in JumpCloud when a user’s status changes from either Leave or Inactive to Onboarding or Active in Personio.
- Apply Advanced Filters on import (optional). See Personio’s API documentation for available filters
To start a manual import
- Expand the Import Users section and click Start Manual Import.
- Select one of the following options:

![]()
If the option selected includes user updates, the following will occur:
- Any and all changes made to the mapped user attributes in the source application will be made in JumpCloud.
- Users whose statuses change to one of the defined inactive status will be automatically suspended in JumpCloud.
- If Allow reactivation of users on update is checked, suspended users in JumpCloud, whose status change from the defined inactive statuses to ones that are not defined as inactive, will have their user state changed back to Active in JumpCloud.
- Click Continue.
- If you selected the View and select specific new users to import (updates not supported).
- Select the users you want to import.
![]()
Free accounts can import unlimited users, but will be prompted to upgrade to a paid subscription after 30 days. Similarly, accounts managed by an MSP, that have a license limit, are only allowed to import users up to their license limit and will be prompted to contact their provider once that limit is reached.
- The count of users to be imported will show at the bottom left hand of the list. If this is correct, click Import.
- Review the information in the results modal.
- Click one of the tiles to navigate to the Users page, User Groups page, or Device Groups page or close the modal.
![]()
If you close this modal, you will return to the Identity Management configuration panel.
- You will receive a User Import Complete email with a summary of the import results and a link for downloading a copy of the import results.
- You can now connect users to all their JumpCloud resources. Learn more in the Authorize Users to an Application and Connecting Users to Resources articles.
![]()
Imported users must be members of a user group bound to an application for JumpCloud to manage their identity in and access to the application.
To import with the JumpCloud API
![]()
The import flow using this new API endpoint will only create new users who have an active status in Personio. By default, Leave and Inactive are considered inactive statuses and Onboarding and Active are considered active statuses. See available documentation for this API endpoint.
- Get the application ID for your integration. There are 2 ways:
- Retrieve the application ID from the JumpCloud Admin Portal:
- Log in to JumpCloud Admin Portal.
- Go to USER AUTHENTICATION > SSO.
- Open the Personio application by clicking on it.
- Note the ID from the URL which is just before “/details”: https://console.jumpcloud.com/#/sso/{222220da1f777fbe7502cde}/details
- Retrieve the application ID by making a GET /applications request:
- Retrieve the application ID from the JumpCloud Admin Portal:
curl command example:
curl --request GET \
--url 'https://console.jumpcloud.com/api/applications?fields=id&filter=displayLabel:$eq:Personio' \
--header 'x-api-key: REPLACE_KEY_VALUE' \
--header 'x-org-id: REPLACE_ORG_ID_VALUE'
- To do a manual import, make a POST /applications/{application_id}/import/jobs request using the application ID from the preceding steps.
curl command example for importing new users and user updates with reactivation of users allowed:
curl --request POST \
--url 'https://console.jumpcloud.com/api/v2/applications/{application_id}/import/jobs' \
--header 'accept: application/json' \
--header 'Content-Type: application/json'\
--header 'x-api-key: REPLACE_KEY_VALUE' \
--header 'x-org-id: REPLACE_ORG_ID_VALUE'\
--data '{
"allowUserReactivation": true,
"operations": [
"users.create",
"users.update"
]
}'
curl command example for importing only user updates:
curl --request POST \
--url 'https://console.jumpcloud.com/api/v2/applications/{application_id}/import/jobs'
--header 'accept: application/json' \
--header 'Content-Type: application/json'\
--header 'x-api-key: REPLACE_KEY_VALUE' \
--header 'x-org-id: REPLACE_ORG_ID_VALUE'\
--data '{
"allowUserReactivation": true,
"operations": [
"users.update"
]
}'
3. To run scheduled hourly imports:
curl command that allows reactivation, sends an advanced import filter, and sends the user import complete email after the hourly sync occurs:
curl --request POST \
--url https://console.jumpcloud.com/api/v2/applications/{applicationObjectId}/import/schedules \
--header 'content-type: application/json' \
--data '{"allowUserReactivation":true,"operations":{"userCreate":true,"userUpdate":true},"query":"string","sendEmail":true}'
Updating the Personio Integration in JumpCloud
- Log in to JumpCloud Admin Portal.
- Go to USER AUTHENTICATION > SSO.
- Search for and select Personio from the list to reopen the configuration.
- Select the Identity Management tab.
- Change the desired values
- Click Update.