
Use JumpCloud SAML Single Sign On (SSO) to give your users convenient but secure access to all their web applications with a single set of credentials.
Read this article to learn how to configure the AWS Client VPN connector.
Prerequisites
- A JumpCloud administrator account.
- JumpCloud SSO Package or higher or SSO add-on feature.
- AWS Admin account (AWS root user)
- AWS organization
- An Amazon VPC with an EC2 instance is required.
- See Create a VPC.
- Learn about Launching an EC2 instance. In the instance Security Group allow ICMP traffic from the VPC CIDR range – this is needed for testing.
- You need a private certificate imported into AWS Certificate Manager (ACM).
- You need a Windows or Mac system running the latest AWS Client VPN software.
- You can download the software here.
Creating a new JumpCloud Application Integration
- Log in to the JumpCloud Admin Portal.
- Go to USER AUTHENTICATION > SSO Applications.
- Click + Add New Application.
- Type the name of the application in the Search field and select it.
- Click Next.
- In the Display Label, type your name for the application. Optionally, you can enter a Description, adjust the User Portal Image and choose to hide or Show in User Portal.
![]()
If this is a Bookmark Application, enter your sign-in URL in the Bookmark URL field.
- Optionally, expand Advanced Settings to specify a value for the SSO IdP URL. If no value is entered, it will default to https://sso.jumpcloud.com/saml2/<applicationname>.
![]()
The SSO IdP URL is not editable after the application is created. You will have to delete and recreate the connector if you need to edit this field at a later time.
- Click Save Application.
- If successful, click:
- Configure Application and go to the next section
- Close to configure your new application at a later time
Configuring the SSO Integration
To configure JumpCloud
- Create a new application or select it from the Configured Applications list.
- Select the SSO tab.
- The SP Entity ID should be urn:amazon:webservices:clientvpn.
- The ACS URL should be http://127.0.0.1:35001.
- In the IdP URL, either leave the default value or enter a plaintext string unique to this connector.
- Click save.
Download the JumpCloud metadata file
- Find your application in the Configured Applications list and click anywhere in the row to reopen its configuration window.
- Select the SSO tab and click Export Metadata.
- The JumpCloud-<applicationname>-metadata.xml will be exported to your local Downloads folder.
![]()
Metadata can also be downloaded from the Configured Applications list. Search for and select the application in the list and then click Export Metadata in the top right corner of the window.
To configure AWS
Configure JumpCloud as an AWS Identity Provider
- Log in to the Amazon Web Services console for your organization as an administrator.
- In the main console, go to All Services, under Security, Identity & Compliance select IAM.
- On the left hand side nav, select Identity Providers.
- Select Create Provider.
- For Provider Type, select SAML.
- For Provider Name, enter JumpCloud. If another name is chosen, this string will need to replace JumpCloud in the role attribute value in the JumpCloud configuration.
- Select Choose File, then upload the metadata file.
![]()
By default, the JumpCloud metadata file is saved as JumpCloud-aws-metadata.xml.
- Select Next Step.
- On the next screen, select Create.
Create an AWS Client VPN Endpoint
After you set up JumpCloud as the identity provider in AWS, create an AWS Client VPN Endpoint.
- Log in to the Amazon Web Services console for your organization as an administrator.
- In the Find Services search bar, enter VPC, then select VPC from the results.
- One the left hand side nav, select Client VPN Endpoints under Virtual Private Network (VPN).
- Click Create Client VPN Endpoint.
- Enter information for Name Tag and Description.
- To allocate an IP range for your remote users, enter the IP range In Client IPv4 CIDR.
- For Server Certificate ARN, select the certificate you created. See Prerequisites.
- For Authentication Options, select Use user-based authentication, then Federated authentication.
- For SAML provider ARN, select JumpCloud, the identity provider you created in Configure JumpCloud as an AWS Identity Provider.
- To log connections in Amazon CloudWatch, select Yes for Do you want to log the details on client connections?. If you don’t want to log connections, select No.
- To ensure that only the traffic to the VCP IP range is forwarded using the VPN, select the check box for Enable split-tunnel.
- Click Create Client VPN Endpoint.
Configure AWS Client VPN Endpoint Options
Finish configuring your AWS Client VPN endpoint by associating it with a target VPC and setting up SAML group-specific authorization.
To associate a Client VPN with a Target VPC
- Log in to the Amazon Web Services console for your organization as an administrator.
- In the Find Services search bar, enter VPC, then select VPC from the results.
- One the left hand side nav, select Client VPN Endpoints under Virtual Private Network (VPN).
- Select the Client VPN endpoint created in Create an AWS Client VPN Endpoint. It’s in a Pending state.
- Select Associations, then click Associate.
- From the drop-down, select the target VPC and subnet you want to associate your endpoint with.
- (Optional) Repeat the previous steps to associate your Client VPN endpoint to another subnet for high availability.
To set up SAML group-specific authorization
- Select Authorization in the Client VPN options, then click Authorize Ingress.
- For Destination network to enable, enter the IP address of your EC2 instance created in the prerequisites.
- For Grant access to, select Allow access to users in a specific access group.
- For Access group ID field, enter the name of the group you want to allow access to the EC2 instance.
- Optionally, provide a description.
- Click Add authorization rule.
Testing the AWS VPN Client Connection
To verify you configured your AWS VPN Client correctly, test connecting to the AWS VPN client.
To test connecting to the AWS VPN client
- Log in to the Amazon Web Services console for your organization as an administrator.
- In the Find Services search bar, enter VPC, then select VPC from the results.
- One the left hand side nav, select Client VPN Endpoints under Virtual Private Network (VPN).
- Select the Client VPN endpoint you configured in Configure AWS Client VPN Endpoint Options. It’s in an Active state.
- To download the configuration profile to your desktop, click Download Client Configuration.
- Open the AWS Client VPN desktop app on your system. See Prerequisites.
- In the menu, go to File > Manage Profiles.
- Click Add Profile and select the configuration profile you downloaded in step 2. Give it a display name.
- You see the profile in the AWS Client VPN list. Select it, then click Connect.
Authorizing User SSO Access
Users are implicitly denied access to applications. After you connect an application to JumpCloud, you need to authorize user access to that application. You can authorize user access from the Application Configuration panel or from the Groups Configuration panel.
To authorize user access from the Application Configuration panel
- Log in to the JumpCloud Admin Portal.
- Go to USER AUTHENTICATION > SSO Applications, then select the application to which you want to authorize user access.
- Select the User Groups tab. If you need to create a new group of users, see Get Started: User Groups.
- Select the check box next to the group of users you want to give access.
- Click save.
To learn how to authorize user access from the Groups Configuration panel, see Authorize Users to an SSO Application.
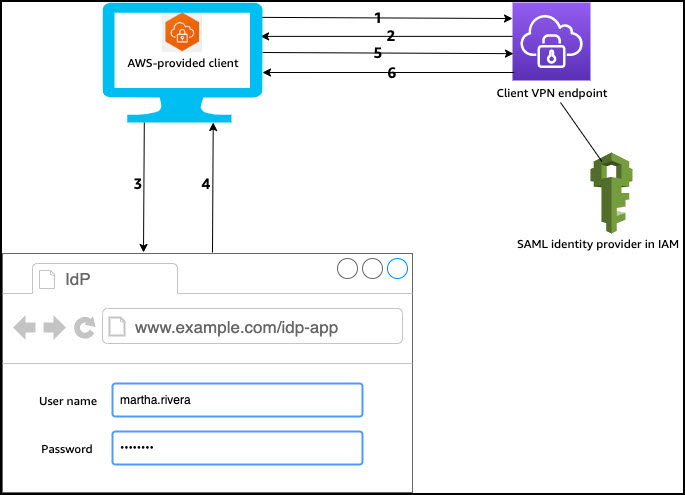
Authentication workflow
- The user opens the AWS provided client on their device and initiates a connection to the Client VPN endpoint.
- The Client VPN endpoint sends an IdP URL and authentication request back to the client, based on the information that was provided in the IAM SAML identity provider.
- The AWS provided client opens a new browser window on the user's device. The browser makes a request to the IdP and displays a login page.
- The user enters their credentials on the login page, and the IdP sends a signed SAML assertion back to the client.
- The AWS provided client sends the SAML assertion to the Client VPN endpoint.
- The Client VPN endpoint validates the assertion and either allows or denies access to the user.
To deactivate the SSO Integration
- Log in to the JumpCloud Admin Portal.
- Go to USER AUTHENTICATION > SSO Applications.
- Search for the application that you’d like to deactivate and click to open its details panel.
- Select the SSO tab.
- Scroll to the bottom of the configuration.
- Click Deactivate SSO.
- Click save.
- If successful, you will receive a confirmation message.
To delete the application
- Log in to the JumpCloud Admin Portal.
- Go to USER AUTHENTICATION > SSO Applications.
- Search for the application that you’d like to delete.
- Check the box next to the application to select it.
- Click Delete.
- Enter the number of the applications you are deleting
- Click Delete Application.
- If successful, you will see an application deletion confirmation notification.