The JumpCloud Directory Platform centralizes user management for virtually all of the resources at play in your organization — via a single set of credentials. You can manage and view information about your organization’s end users from the Admin Portal Users list. Read this article to learn more about how you can use the Users list.
Finding the Users List
You can find the Users list from the Admin Portal’s left menu.
To find the Users List:
- Log in to the JumpCloud Admin Portal.
- Go to USER MANAGEMENT > Users.
Searching for a User
Use the search bar or a filter to make it easier to find the users you’re looking for.
Search Bar
If there’s a specific user you’re interested in viewing, search for them from the search bar.
To find a user using the search bar:
- Log in to the JumpCloud Admin Portal.
- Go to USER MANAGEMENT > Users.
- In the Search bar, enter one of the user’s attributes, like email, first name, or employee ID.
When you’re done with your search, click the ( x ) in the search bar to clear it.
Filter By
Need to see whose password is about to expire or which users aren’t required to use multi-factor authentication? Use a filter to see every user who has a status you’re interested in.
To add a filter to your Users List:
- Log in to the JumpCloud Admin Portal.
- Go to USER MANAGEMENT > Users.
- Click filter by, then select the filters you want to use. You can include as many filters as you’d like.
When you’re done with a filter, click ( x ) in the search bar to clear it.
Using the More Actions Menu
The more actions menu lets admins enable actions across one or more users from the list view. The more actions menu is inactive until one or more users are selected. After users are selected, you can use the more actions menu to update account status’, manage MFA requirements, or resend activation emails. Learn more about the actions you can take across your users see Get Started: Admin Portal.
Customizing the Users List View
By default, the Users List shows five columns: Status, Name, Email, TOTP MFA status, and Password Expiry. You can’t remove a user’s status and name from the list view, but you can customize the other columns to show the information you want to see. For example, instead of showing email, use the columns feature to show users’ system usernames or locations.
To customize the Users List View:
- Log in to the JumpCloud Admin Portal.
- Go to USER MANAGEMENT > Users.
- In the top right, click columns, then select the information you want to show.
![]()
You can show a maximum of eight columns.

- To close the list, click columns.
If you ever want to go back to the default Users List view, you can at any time.
To change the Users List view back to the default:
- Log in to the You can show a maximum of eight columns.
- Go to USER MANAGEMENT > Users.
- Click columns, then click Revert to default columns.
Exporting the Users List
Use the export feature in the Users List view to export all of your user information for audits, compliance, or troubleshooting reports. The export feature lets you export to either CSV or JSON.
To export your Users list:
- Log in to the JumpCloud Admin Portal.
- Go to USER MANAGEMENT > Users.
- In the top right, click export, then select either Export JSON or Export CSV. Your list of users is exported into the format of your choice and is saved as jcuserlist_yyyymmdd.<filetype>.
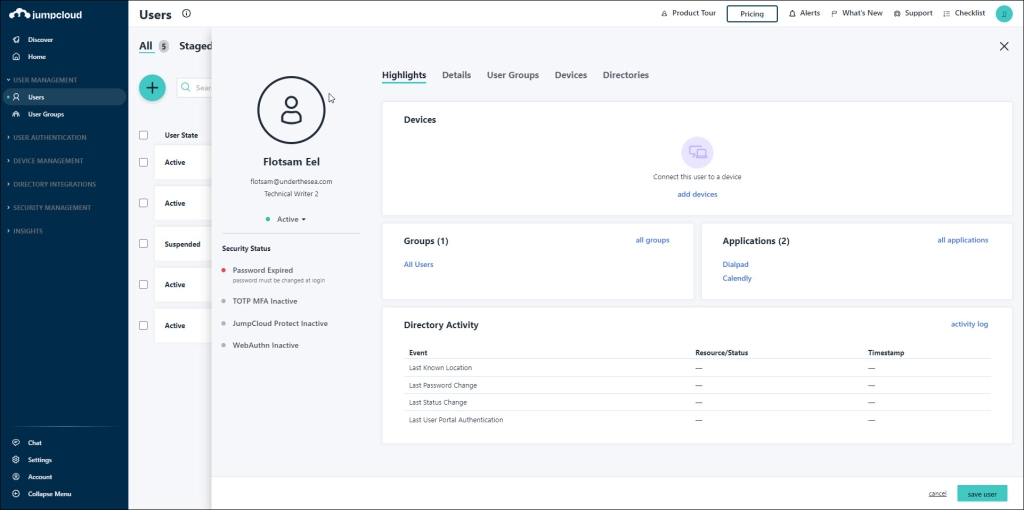
Directory Activity
The Directory Activity widget shows the top events from Directory Insights that are specific to that user. The Directory Activity shows events for features that are enabled for the org. If your org isn’t using RADIUS, for example, there aren’t any RADIUS events listed.
Depending on the features you’ve enabled, here are the available Directory Insights events and criteria:
- Last Device Authentication
- login_attempt
- Last Known Location
- login_attempt
- Last LDAP Authentication
- ldap_bind
- Last Password Change
- user_password_change
- Last RADIUS Authentication
- radius_auth_attempt
- Last SSO Authentication
- sso_auth
- Last Status Change
- user_lockout, user_password_expired, user_activated, user_unlocked, user_suspended, user_unsuspended, user_deactivated
Organizations on all pricing plans see the Directory Activity widget in the Highlights tab. If you want to see more Directory Activity detail in the context of the Activity Log, you can click activity log. Directory Insights customers are directed to the Directory Insights activity log with the “User” filter applied for the user they’re viewing.
Customers without Directory Insights can add this feature by contacting their Technical Account Manager.
User Highlights Tab
The User Highlights tab offers a summary of the resources a user is connected to and their directory activity log.
To find the Highlights tab:
- Log in to the JumpCloud Admin Portal.
- Go to USER MANAGEMENT > Users.
- Select an existing user or see Get Started: Users, to learn how to create a new user. Then you’ll see the Highlights tab.
Using the Highlights Tab with a New User
When you create a new user, the Highlights tab will be empty. To get started with adding a device, user group, or application, click add device, add user group, or add application.
See Connect Users to Resources to learn more.
Exploring the Highlights Tab with an Existing User
After you’ve created a user and connected them to resources, the User panel Highlights tab gives you a summary of the most important directory activity logs and the devices, user groups, and applications associated with a user.
Devices
The Devices widget lists up to three devices per user. Click all devices to go to the Devices tab where you can see all devices connected to a user if there are more than three. From the Devices tab, you can also bind more devices to a user or remove their access to a device.
User Groups
The User Groups widget lists up to five User Groups. Click all groups to go to the User Groups tab where you can see all User Groups associated with a user if there are more than five. From the User Groups tab, you can also add a user to more User Groups or remove them.
Applications
The Applications widget lists up to five applications. Click all applications to view a list that shows the following information:
- Names of all the applications a user has access to.
- User Groups that are providing the user access to the applications.
Applications are associated to users through User Groups. You can update a user’s association to an application when you update the User Group’s access to an application or when you update a user’s association with a User Group. You can initiate either of these updates from the Highlights tab.
To update a User Group’s access to an application from the Highlights tab:
- In the Applications widget, click all applications.
- Click on a User Group. You’re taken to the Applications tab on the User Group panel where you can update the User Group’s access to applications.
- When you’ve made your changes, click save.
To update a user’s association to a User Group from the Highlights tab:
- In the User Groups widget, click all groups. You’re taken to the User Group tab in the Users tab where you can update the user’s associations with User Groups.
- When you’ve made your changes, click save.