
Use JumpCloud SAML Single Sign On (SSO) to connect Microsoft 365/Entra ID (M365) with JumpCloud to give your users convenient but secure access with a single set of credentials.
Read this article to learn how to setup JumpCloud's SSO connector for M365.
![]()
Read SAML Configuration Notes.
Prerequisites
- All users who will be using M365 SSO must be associated (bound) to the M365 Cloud Directory Integration instance prior to configuring SSO and enabling federation in M365. Users who are not bound to the M365 Cloud Directory Integration will NOT be able to login using SSO, because they will be missing the required M365 immutable ID.
- PowerShell is required to modify M365 Federation configurations:
- PowerShell Core can be used on any computer (Windows, macOS, Linux) with the following required modules:
- Microsoft Graph PowerShell Module
- JumpCloud.Office365.SSO
- ExchangeOnlineManagement (optional, when using M365 for hosted custom domain email for Exchange Online)
- PowerShell Core can be used on any computer (Windows, macOS, Linux) with the following required modules:
- The M365 Cloud Directory integration allows you to create and manage M365 user identities directly from JumpCloud. See the following articles for more information:
![]()
On Windows, PowerShell 5.1 or higher must be used. PowerShell Core has version 7+.
- Verify you have “Global administrator” level access to your M365 tenant/organization.
- Go to Azure Active Directory > Users > select the user > Assigned Roles. Your account should have “Global administrator” listed
- Modern Authentication must be enabled on the M365 tenant
- If MFA is enforced on end users in both environments, they will be prompted for MFA twice during the login process - once in JumpCloud and again in M365
- Confirm the following in Azure Active Directory > Custom Domain Names
- The domain you would like to federate (e.g., YOUR_DOMAIN.com) is listed, verified, and not the Primary/(Default)
- The onmicrosoft.com default domain or another domain you do not want to federate is the Primary/ (Default) domain. Set up a global admin account in your default domain (for example, admin@YOUR_DOMAIN.onmicrosoft.com) so that there is an admin account that can sign in outside of SSO as a failsafe
- Federation must be disabled on the target domain. If you need to disable Federation, see Disable Microsoft 365 Federation with PowerShell
Considerations
Important Considerations
- In M365, MFA is automatically turned on when security defaults are enabled, regardless of your other MFA settings. If JumpCloud MFA is enabled while also having M365 MFA enabled, end users will encounter two separate MFA prompts during the same login. See Troubleshooting to disable these settings
- The default domain in M365 cannot be federated
- When SSO is enabled, all users in the email domain you’re configuring SSO for are affected. After SSO is enabled, users aren't able to log in to Microsoft 365 using password authentication
General Considerations
- At this time, JumpCloud doesn't support integration with GoDaddy's implementation of M365. This version has limited identity management capabilities that require SSO login with GoDaddy's services to operate appropriately. Because of these requirements, we are prohibited from making changes to identities with the GoDaddy integration
- After a M365 domain is federated, the Microsoft applications your employees use to access their email may work differently, especially older “legacy” applications. See the following articles for more information:
Entra Sync Considerations
- SSO with existing Entra Connect or Entra Connect Cloud Sync - If you want to use JumpCloud's SSO, but still use a local Active Directory to manage your M365 users, you must import your users into JumpCloud using the Directories tool before SSO becomes available
![]()
If Entra Connect or Entra Connect Cloud Sync is active for your organization, JumpCloud won't be able to update your users in M365. SSO will still function based on users' JumpCloud logins.
- If you are migrating your M365 users from Entra Connect or Entra Connect Cloud Sync to JumpCloud management, JumpCloud can't manage the users until Entra Connect or Entra Connect Cloud Sync is disabled
- To disable directory sync:
- Run PowerShell as administrator
- Install Powershell Modules if you haven’t already
- Run Connect-MgGraph -TenantId “” -Scopes “Organization.ReadWrite.All, Directory.ReadWrite.All, Domain.ReadWrite.All, IdentityProvider.ReadWrite.All"
- Run Get-MgOrganization | Select-Object DisplayName, OnPremisesSyncEnabled
- The value for OnPremisesSyncEnabled appears as True or null (empty), meaning True is enabled
- To disable, run the following cmdlet:
- To disable directory sync:
$OrgID = (Get-MgOrganization).id
$uri = "https://graph.microsoft.com/beta/organization/$orgid"
$body = @'
{
"onPremisesSyncEnabled": 'false'
}
'@
invoke-MgGraphRequest -uri $uri -Body $body -Method PATCH
- To verify the change, run Get-MgOrganization | Select-Object DisplayName, OnPremisesSyncEnabled
![]()
It may take up to 20 minutes for the setting change to be applied.
![]()
This setting applies to all domains in your M365 account, not just SSO domains.
iOS Considerations
The iOS Mail client supports SSO. If you want to use JumpCloud’s SSO with the iOS Mail client:
- On the device, navigate to Settings > Mail > Accounts > Exchange
- Enter your email address and a description and click Next
- Click Sign In, this will trigger the Safari redirect to the JumpCloud User Portal
Creating a new JumpCloud Application Integration
- Log in to the JumpCloud Admin Portal.
- Go to USER AUTHENTICATION > SSO Applications.
- Click + Add New Application.
- Type the name of the application in the Search field and select it.
- Click Next.
- In the Display Label, type your name for the application. Optionally, you can enter a Description, adjust the User Portal Image and choose to hide or Show in User Portal.
![]()
If this is a Bookmark Application, enter your sign-in URL in the Bookmark URL field.
- Optionally, expand Advanced Settings to specify a value for the SSO IdP URL. If no value is entered, it will default to https://sso.jumpcloud.com/saml2/<applicationname>.
![]()
The SSO IdP URL is not editable after the application is created. You will have to delete and recreate the connector if you need to edit this field at a later time.
- Click Save Application.
- If successful, click:
- Configure Application and go to the next section
- Close to configure your new application at a later time
Configuring the SSO Integration
To configure JumpCloud
![]()
Ensure that all users who will be using M365 SSO are associated (bound) to your M365 Cloud Directory Integration instance. Users who are not associated (bound) to the M365 Cloud Directory Integration will NOT be able to login using SSO, because they will be missing the required M365 immutable ID.
- Log in to M365 / Entra ID.
- Verify that all users you will use SSO have an immutable ID.
- Navigate to Identity > Users > All users > {individual user} > Properties
- Scroll down until you see the On-premises immutable ID field in the right column.

- Log in to the JumpCloud Admin Portal.
- Create a new application or select it from the Configured Applications list.
- Select the SSO tab.
- Replace instances of YOUR_DOMAIN in the IdP Entity ID and Login URL fields with the name of the domain you will be federating.

![]()
The IdP Entity ID and Login URL fields must match the M365 domain that’s to be SSO-enabled (federated) over to JumpCloud. These fields shouldn’t be the default domain, (e.g., YOUR_DOMAIN.onmicrosoft.com).

- Add any desired additional attributes.
- Click save.
- Find Microsoft 365 in the Configured Applications list and click anywhere in the row to reopen the application configuration panel.
- Select the SSO tab and click Export Metadata.
![]()
The JumpCloud-office365-metadata.xml file will download to your local Downloads folder.
To regenerate your Microsoft 365 IdP certificate
You can regenerate your M365 IdP certificate at any time.
![]()
Before you begin this process, you will need access to your M365 tenant using an account that isn’t bound by the SSO login process. As stated earlier in the article, this would be a global admin account in your M365 tenant that’s part of a domain that isn’t federated (typically something like admin@YOUR_DOMAIN.onmicrosoft.com).
![]()
The certificate regeneration process will break SSO logins until complete. You should notify the rest of your infrastructure team about the outage. This should be done during off hours to reduce the chance of a login issue for your users.
- After regenerating the certificate, you must export a new metadata file:
- In the SSO tab, click Export Metadata.
- The new metadata file will download to your local Downloads folder.
- Disable the current configuration:
Disable-JumpCloud.Office365.SSO -XMLFilePath .\JumpCloud-office365-metadata.xml
![]()
M365 will not recognize the new metadata file until the current configuration is disabled.
- Upload the new metadata file:
Enable-JumpCloud.Office365.SSO -XMLFilePath .\JumpCloud-office365-metadata.xml
![]()
If you need a more advanced configuration, see SSO with Microsoft 365 - Alternative Manual Service Provider Set Up Method.
To configure Microsoft
Installing Microsoft Powershell Modules
- Run PowerShell as an administrator.
- Install the Microsoft.Graph Module for Windows PowerShell (as referenced in the Prerequisites section):
- Run Install-Module PowershellGet
- Answer Y to install the NuGet Provider.
- Answer A to Answer Yes to All to install from PSGallery.
- Run Install-Module Microsoft.Graph
- Modify the PowerShell execution policy to Remote Signed:
- Run Set-ExecutionPolicy RemoteSigned
- Answer A to confirm the change to the Execution Policy.
- Enter your M365 Global Administrator credentials.
- Install the Microsoft Exchange Online Management module (as referenced in the Prerequisites section):
- Run Install-Module ExchangeOnlineManagement
- Answer A to Answer Yes to All to install from PSGallery.
Connecting to the M365 Tenant
- Connect to the M365 /Entra ID tenant:
Connect-MGGraph -Scopes "Domain.ReadWrite.All", "Directory.AccessAsUser.All", "Organization.ReadWrite.All", "Directory.ReadWrite.All"
![]()
For more information, see Find your Microsoft 365 tenant ID.
Connecting to Exchange
- Connect to Microsoft Exchange:
- Run Connect-ExchangeOnline.
- Enter your M365 Global Administrator credentials.
To enable federation in M365
![]()
If you would like to test SSO on a staging domain before federating your production domain, see Testing M365 SSO for named accounts.
To enable SSO, enable federation between your JumpCloud organization and your M365 tenant. The next steps will verify your current configuration and enable this federation. This step will make JumpCloud your IdP, but some settings will remain within Azure and M365, such as the option to remain logged in. You may set app specific conditional access policies in JumpCloud that will obligate users to authenticate through MFA or using modern authentication.
- Verify the current authentication method of your M365 domains:
- Run Get-MgDomain | Select Id, AuthenticationType
- For domains that list the authentication type as Managed, SSO is disabled.
- For domains that list the authentication type as Federated, SSO is enabled.
- Run Get-MgDomain | Select Id, AuthenticationType
- If you have not, install Microsoft’s JumpCloud SSO PowerShell Module (as referenced in the Prerequisites section):
- Run Install-Module -Name JumpCloud.Office365.SSO
- Answer A to Answer Yes to All to install from PSGallery.
- Verify the current JumpCloud federation status of your M365 domain:
- Run Show-JumpCloud.Office365.SSO to show the current status of JumpCloud SSO Federation for a specific domain.
- At the Domain: prompt, enter your domain name.
- The result returns the JumpCloud federation status for the domain provided.


- Enable Single Sign On (SSO):
Enable-JumpCloud.Office365.SSO -XMLFilePath .\JumpCloud-office365-metadata.xml
- Verify the change:
Show-JumpCloud.Office365.SSO
- Disconnect from the Graph connection:
Disconnect-MGGraph
Authorizing User SSO Access
Users are implicitly denied access to applications. After you connect an application to JumpCloud, you need to authorize user access to that application. You can authorize user access from the Application Configuration panel or from the Groups Configuration panel.
To authorize user access from the Application Configuration panel
- Log in to the JumpCloud Admin Portal.
- Go to USER AUTHENTICATION > SSO Applications, then select the application to which you want to authorize user access.
- Select the User Groups tab. If you need to create a new group of users, see Get Started: User Groups.
- Select the check box next to the group of users you want to give access.
- Click save.
To learn how to authorize user access from the Groups Configuration panel, see Authorize Users to an SSO Application.
Validating SSO user authentication workflow(s)
IdP-initiated user workflow
- Access the JumpCloud User Console
- Go to Applications and click an application tile to launch it
- JumpCloud asserts the user's identity to the SP and is authenticated without the user having to log in to the application
SP-initiated user workflow
- Go to the SP application login - generally, there is either a special link or an adaptive username field that detects the user is authenticated through SSO
![]()
This varies by SP.
- Login redirects the user to JumpCloud where the user enters their JumpCloud credentials
- After the user is logged in successfully, they are redirected back to the SP and automatically logged in
Disabling M365 SSO
- Run PowerShell as an administrator.
- Install Powershell Modules if you haven’t already.
- Change the directory of your PowerShell session to the location of the JumpCloud metadata file downloaded in To configure JumpCloud. For example, replace <User> with the active username: cd “C:\Users\<User>\Downloads”.
- Run Disable-JumpCloud.Office365.SSO -XMLFilePath .\JumpCloud-office365-metadata.xml
![]()
Per Microsoft documentation, it may take up to 2 hours for the sign-in process to be updated, and in some extreme cases up to 24 hours.
To delete the application
- Log in to the JumpCloud Admin Portal.
- Go to USER AUTHENTICATION > SSO Applications.
- Search for the application that you’d like to delete.
- Check the box next to the application to select it.
- Click Delete.
- Enter the number of the applications you are deleting
- Click Delete Application.
- If successful, you will see an application deletion confirmation notification.
Troubleshooting

Check your IdP Entity ID. It must be in either a https://domain.com format or urn:uri:domain.com format. Change the value to the correct format and try to save the configuration again.
Cause:
When setting up SSO Federation with M365, MFA is automatically turned on when security defaults are enabled, regardless of your other MFA settings.
Resolution:
Use the following steps to Disable MFA security defaults:
- Sign in to the Microsoft Entra admin center as at least a Security Administrator.
- Browse to Identity > Overview > Properties.
- Select Manage security defaults.
- Set Security defaults to disable.
- Select Save.

When Microsoft 365 is federated, you can't add new users in Microsoft 365. The new user has to be created in JumpCloud to assign federation to them. You can't assign a federated domain to a user in the Microsoft 365 Admin Center because all federated users must be created on-premises and must be synced using the Microsoft Azure Active Directory Sync Tool.
Symptom: I am getting errors similar to the ones below:
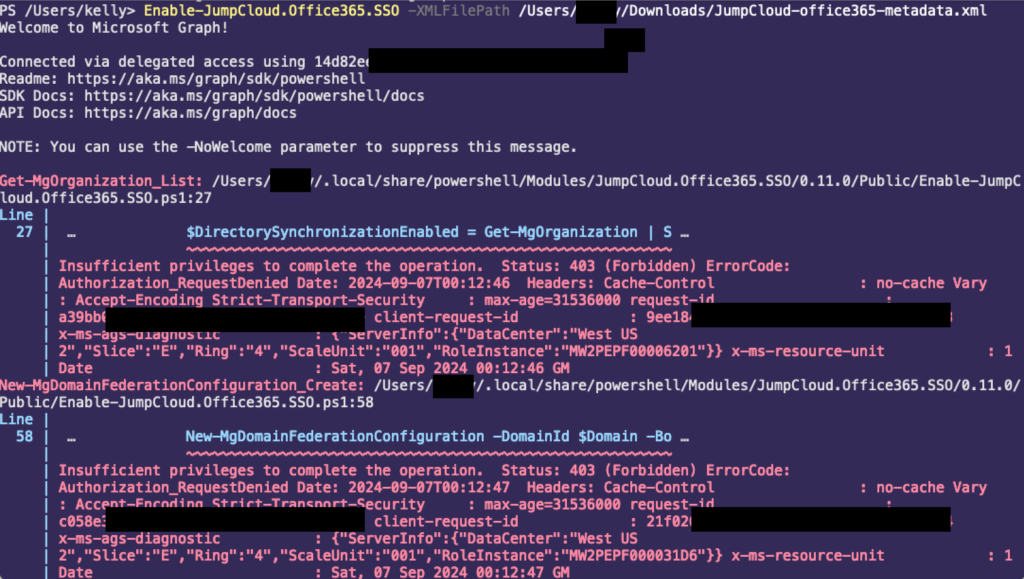
Resolution:
- Create a Global administrator account with a default domain (admin@YOUR_DOMAIN.onmicrosoft.com) to keep the SSO failsafe and have an admin account that is outside SSO. While federating using Powershell, this error could be a result of customer using this default admin account while configuring SSO.
- Create an M365 account with Global administrator privileges with same domain that needs to be federated and use the account for SSO configuration at the Powershell prompt for authentication.
This error occurs when something happens with the federation on Microsoft’s side. The quickest and easiest way to resolve this is to disable and then re-enable the SSO.
- Export a new metadata file:
- In the SSO tab, click Export Metadata
- The new metadata file will download to your local Downloads folder
- Disable the current configuration:
- Disable-JumpCloud.Office365.SSO -XMLFilePath .\JumpCloud-office365-metadata.xml
![]()
M365 will not recognize the new metadata file until the current configuration is disabled.
- Upload the new metadata file:
- Enable-JumpCloud.Office365.SSO -XMLFilePath .\JumpCloud-office365-metadata.xml
This will reconfigure SSO on Microsoft and should resolve this issue.